


Introduction
Some sort of workflow functionality has been sought after by Oracle APEX developers for many years, many writing custom code to handle the flows, in more recent times I've been using Flows for APEX, which I've found excellent to use and the use of BPMN makes it Business friendly and easy to model your business process graphically when discussing a new process, you can then add in the links to code, emails and tasks in APEX afterward.
This post however is on the latest "Workflow" components in Oracle APEX 23.2, released on 17th October 2023. This is my first look at the workflow component and I'll take you through a simple workflow for a Document Review process. A user will upload a document into APEX, and once uploaded an API will be called to extract the text in the document, a Human Task will then be created to ask someone to verify the text, and once verified the original user will be informed that the document has been uploaded provided the original user is not the verifier of the document.
Where are the workflow components in APEX?
You will find the workflows menu item under the Workflows and Automations region on the Shared Components page.

Once we have defined a workflow they can then be selected as a Process type in a page, I'm sure there will be an API too but there's no reference to it yet as the documentation for 23.2 hasn't been published! Will update you when it is.
Pre-requisites
Table
For this post, we'll require a single table to store the document and some attributes about it.
  CREATE TABLE "DOCUMENT_REVIEWS"
   (    "DOC_ID" NUMBER GENERATED BY DEFAULT ON NULL AS IDENTITY MINVALUE 1 MAXVALUE 9999999999999999999999999999 INCREMENT BY 1 START WITH 1 CACHE 20 NOORDER  NOCYCLE  NOKEEP  NOSCALE  NOT NULL ENABLE,
    "BLOB_CONTENT" BLOB,
    "FILENAME" VARCHAR2(255 CHAR) NOT NULL ENABLE,
    "MIME_TYPE" VARCHAR2(255 CHAR) NOT NULL ENABLE,
    "CREATED_BY" VARCHAR2(100 CHAR) NOT NULL ENABLE,
    "CREATED_DATE" DATE NOT NULL ENABLE,
    "REVIEW_STATUS" VARCHAR2(40 CHAR) NOT NULL ENABLE,
    "REVIEWED_BY" VARCHAR2(100 CHAR),
    "REVIEWED_DATE" DATE,
    "REVIEWED_COMMENTS" VARCHAR2(4000 CHAR),
    "WORKFLOW_ID" NUMBER,
    "CLOB_CONTENT" CLOB,
     CONSTRAINT "DOCUMENT_REVIEWS_PK" PRIMARY KEY ("DOC_ID")
  USING INDEX  ENABLE
   ) ;
Package
This package will be used to store a procedure that we'll use to extract the text from a PDF stored in the database. The Extracted text string will then be saved back to the CLOB_CONTENT column in the table above. For brevity and due to permission on apex.oracle.com my PDF to Text procedure doesn't work there, so I've hardcoded it for now!
Package Spec
create or replace package "DOCUMENT_REVIEW_PKG" as

--==============================================================================
-- Get_Text procedure - Extracts text from PDF into CLOB
--==============================================================================
procedure get_text (
    p_doc_id     in     number );


end "DOCUMENT_REVIEW_PKG";
/
Sample Package Body
create or replace package body "DOCUMENT_REVIEW_PKG" as
--==============================================================================
-- Get_Text procedure - Extracts text from PDF into CLOB and stores back
-- in document_reviews table
--==============================================================================
procedure get_text (
    p_doc_id     in     number )
is
begin
-- call oracle_text etc to convert PDF to TXT, for simplicity and due to
-- constraints on apex.oracle.com just hardcoding value.
    update document_reviews
    set clob_content = 'This is the test doc contents!'
    where doc_id = p_doc_id;

end get_text;
end "DOCUMENT_REVIEW_PKG";
Create a Task Definition
Before we start on the workflow we'll define a Task that we will include in it.
The task will be for a user to review the text that an API call has extracted from the PDF that has been uploaded. The Task Owner will be able to modify the extracted text if necessary.
Navigate to Shared Components -> Task Definitions -> Create
Enter new Task details
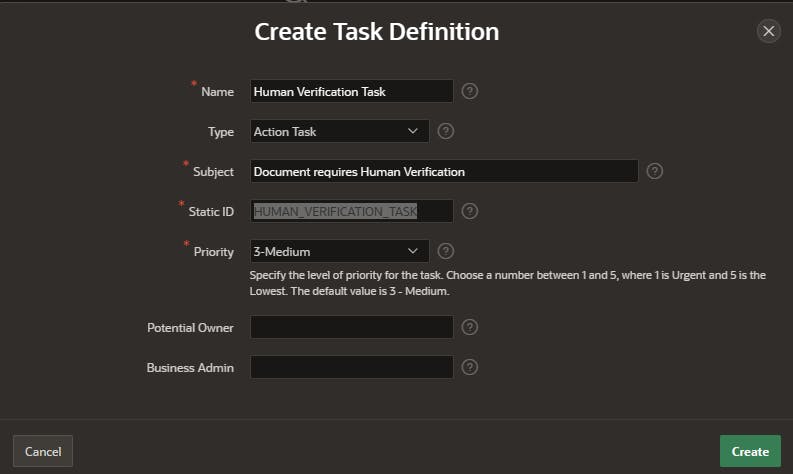
Create a Task Details page,

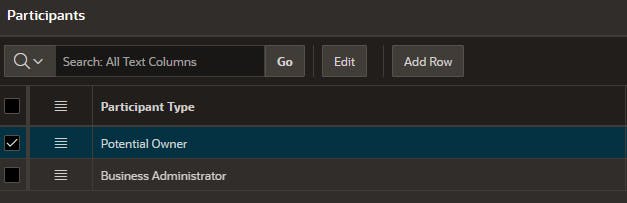
Add some participants, a potential Owner and a Business Administrator, I've used static values for this example. (use your email address to ease testing later)
Add a single parameter, labeled "Captured Text" and set it to Updatable, this is a new 23.2 feature and will allow the value to be modified on the Task Details page. This is a great new feature!

We'll also add two Actions, one to capture the Parameter update and one for the Completion of the task.
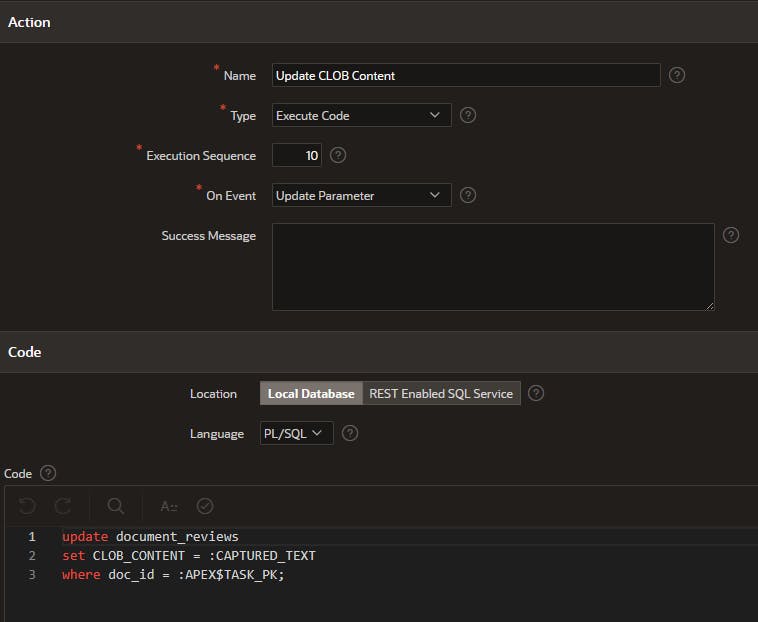
Note: the bind variable in the above update statement matches the static ID of the Parameter created earlier.
Below note we use APP_USER bind variable to capture the logged in user completing the task.

Build the Workflow
The Workflow Definition page looks a lot like Page Designer, with a three-pane layout. When you first open it there will be no workflows defined so a basic new one is rendered on screen.
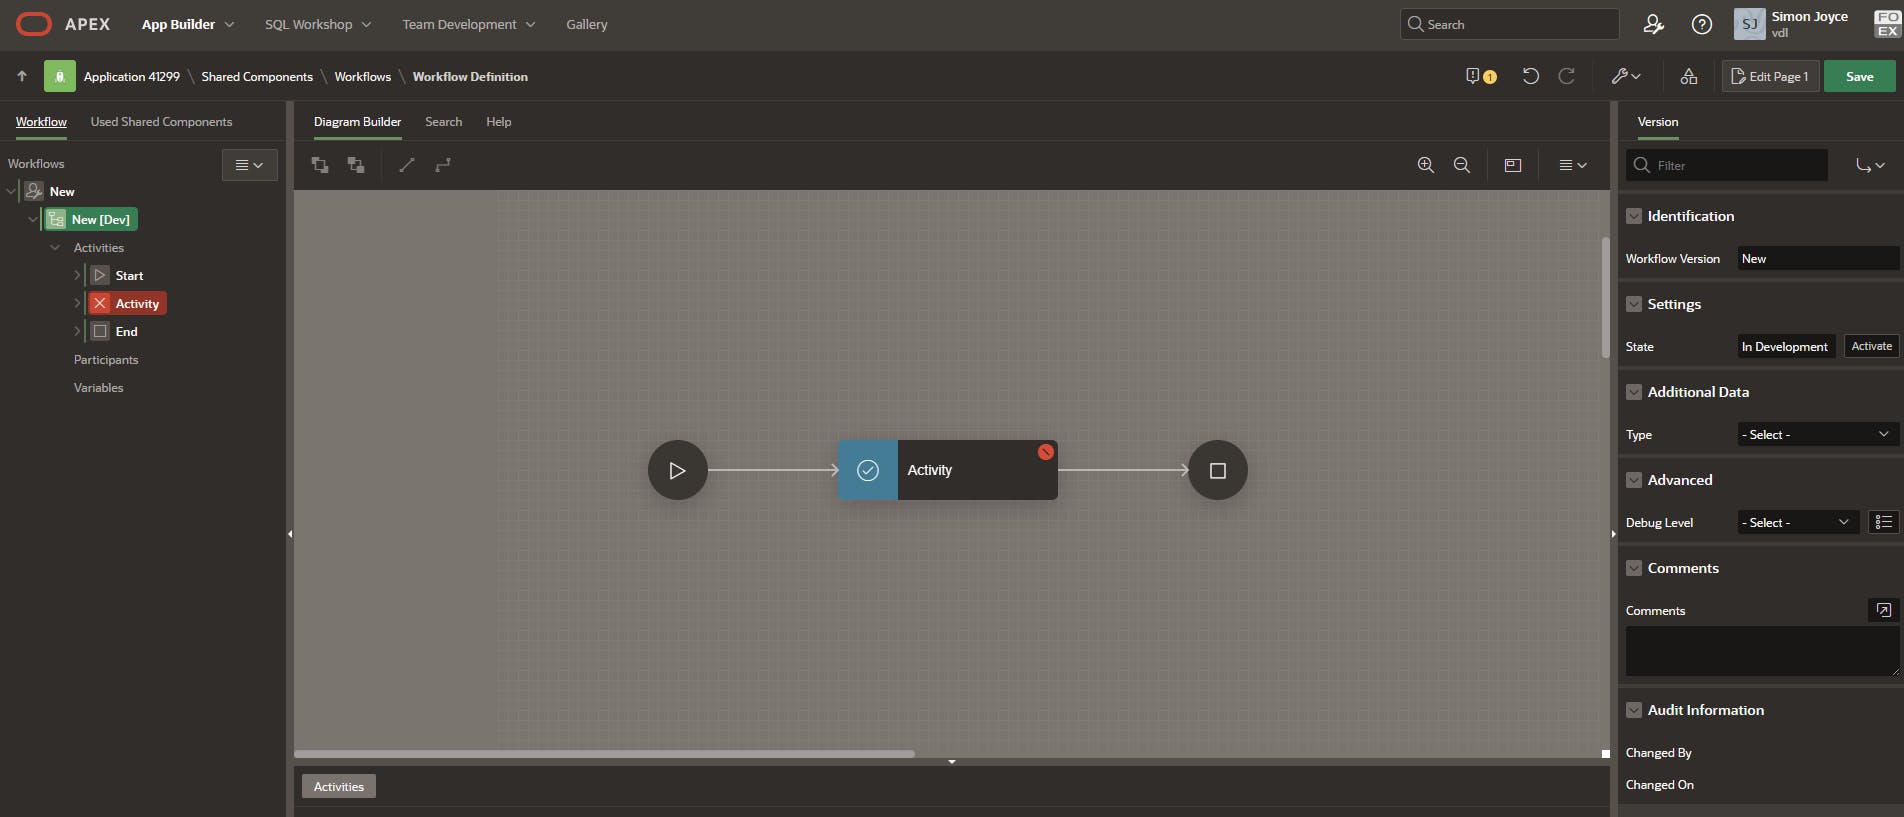
The Workflow navigation tree starts with the Workflow Node, then the Version, the Activities and their connections, and finally, the participants and variables.
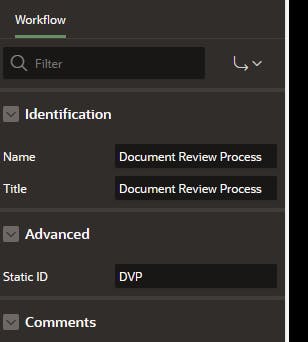
Let's name our workflow "Document Review Process", I reckon the Static ID will be used by any API calls.
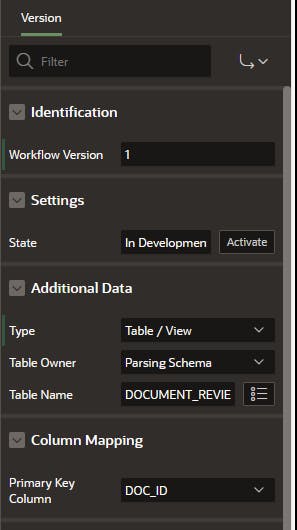
For the Version Node, I'll set it to 1, accept the State setting and in the Additional Data region select the table created earlier and reference the primary key. The data returned from the Table or query can be referenced as bind variables in the rest of the workflow.
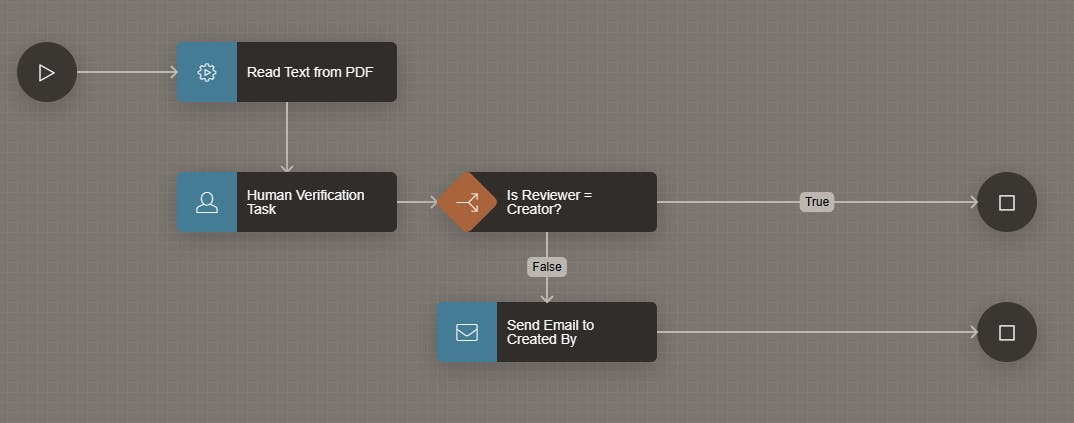
As with any workflow, there should always be a start and end activity. The base definition shows them along with a single activity with an execute code type. Change this to "Invoke API" and we can then use the declarative fields to call the procedure defined earlier, also rename it to something helpful, for example, "Read Text from PDF".

Now as we are using the Invoke API type, we need to define the parameter mappings. Under the Activity in the left-hand pane, you will now see the parameters from the Procedure selected.

Click on the parameter, p_doc_id, and then set the value to have a type of Expression and in the PL/SQL Expression use bind variable notation to indicate the source column, in this case :DOC_ID, from our table source defined at version level.

When the workflow gets to this activity it will call the procedure and use the DOC_ID of the source query of the workflow version.
Now we'll add the second activity which will call the task defined earlier. You can drag a Human Task Create icon from the tool pane to drop it on the line connecting the Read Text from PDF to End activity. Then a bit of dragging will get it spaced out so it's easy to read.

Set the Name to 'Human Verification Task' and in the Definition field select 'Human Verification Task'. For the details primary key item enter DOC_ID, no colon or ampersands are required.

Next we'll add a switch activity. Switch activities allow us to split the workflow path. The Switch can be set one way or another by either:
True False Check
Based on the result of a single condition that returns a boolean (Workflow Variable = value, Row (not) Exists, Expression, Function Call result).
Check Workflow Variable
Based on the value of a Workflow Variable, the different branches perform a comparison against that value.
Case
Based on the result of a computation (Workflow Variable, SQL query result, Function Call result), the different branches perform a comparison against that value.
If Elsif Else
If the conditions in the different branches are more complex, use If Elsif Else to perform AND/OR comparison between the conditions.
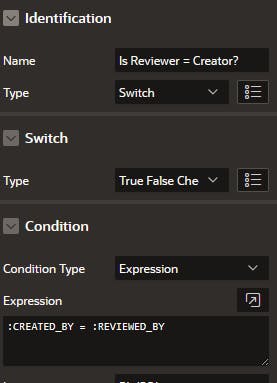
In this example, we'll do a simple Expression to compare two columns in our base table to see if the reviewer matches the created by. If they do then we don't need to send an email confirming the human verification task has been completed but if they don't then we'll send the created by user an email.
Drag in the Switch between the Human Verification Task and the End Activity,

Note the connector to the End Activity is shown in red, we will need to update the attribute on it to either True or False.
First, let's give the switch a name, 'Is Reviewer = Creator?' and set the switch type to "True False Check" and the Condition Type to Expression and the Expression value to ":CREATED_BY = :REVIEWED_BY"
We can then set the connector to the End Activity as follows. Set the Name to True and Condition to True.

We should also rename our End activity to "End - no email".

Now we'll add an email activity and connect it to the switch using the False condition.
Set the name to 'Send Email to Created By', enter &CREATED_BY. in the To field, enter a subject and some Body Plain Text and enable the Send Immediately switch.

Add one last activity of type Workflow End, rename it "End - Email Sent" and add a connector from the Send Email to Created By activity to it. Your workflow should resemble this.
You could also add in wait activities and Send Push Notification activities too, in a similar way to fit your business requirements.
Participants
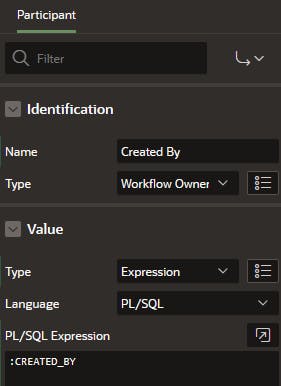
Like Tasks, workflows have participants and these are used by the new Workflow pages we'll see shortly. For now, right-click on the participants node in the left pane and select Create Participant. Select Workflow Administrator for type and select Static for Value Type and your email address for the value. Then create another participant, this time as Workflow Owner, and set the Value Type as Expression and set the value as :CREATED_BY, this will make the CREATED_BY user the owner of the workflow so they can see where it's at.
That's it we have a workflow that will use Call API, Human Task, Send Email and Switch workflow activities. We now need to create a page to call it.
Upload document and start workflow
Create Page and items
Create a blank page, and add a File Upload type page item. Name it Pn_DOCUMENT, and set the file types field to "application/pdf".

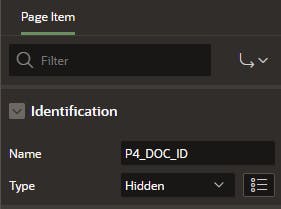
Add a second page item with Hidden type, called Pn_DOC_ID
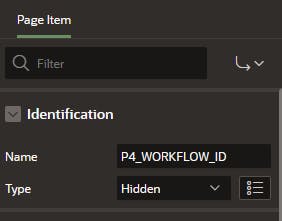
Add a third page item with hidden type, called Pn_WORKFLOW_ID
Now add a button, called Upload, with a Behavior action of Submit Page.

Create Page Processes
Now on to the page processes, first we will save the document to the table created earlier, and return the primary key to the page. Next, we'll call a Workflow start process and return the workflow_id to the page. Finally, we'll save the workflow_id back to the table.
Create a new process and call it file upload, set the type as Execute Code

In the code region paste the following. Replace P4 with whatever your page number is.
declare
l_file_names        APEX_T_VARCHAR2;
l_file              apex_application_temp_files%ROWTYPE;
begin
    -- Split colon delimited string of filenames into a table of filenames
    l_file_names := apex_string.Split (p_str => :P4_DOCUMENT, p_sep => ':');
    -- loop through filenames
    FOR i IN 1 .. l_file_names.count LOOP
        SELECT *
        INTO   l_file
        FROM   apex_application_temp_files
        WHERE  name = L_file_names(i);

      insert into DOCUMENT_REVIEWS(FILENAME,
                                   MIME_TYPE,
                                   CREATED_BY,
                                   CREATED_DATE,
                                   REVIEW_STATUS,
                                   BLOB_CONTENT)
                    VALUES         (l_file.filename,
                                    l_file.mime_type,
                                    :APP_USER,
                                    SYSDATE,
                                    'FOR REVIEW',
                                    l_file.blob_content)
                                    returning DOC_ID into :P4_DOC_ID;
    end loop;
end;
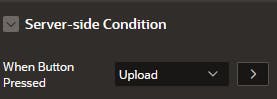
Set the Server Side Condition to when button pressed = Upload.
Add a second process. This time the type will be workflow and in the Settings region select Start as the Type, select the Workflow name created earlier, enter the DOC_ID page item for the Details Primary Key Item and the WORKFLOW_ID page item created moments ago. Optionally enter a success message and set the Server Side Condition to when button pressed = Upload.

Lastly, we'll add one more Execute Code type process. set the Server Side Condition to when button pressed = Upload.

and the code as below, replacing the page number as necessary.
update DOCUMENT_REVIEWS
set workflow_id = :P4_WORKFLOW_ID
where DOC_ID = :P4_DOC_ID;
That's the main page complete.
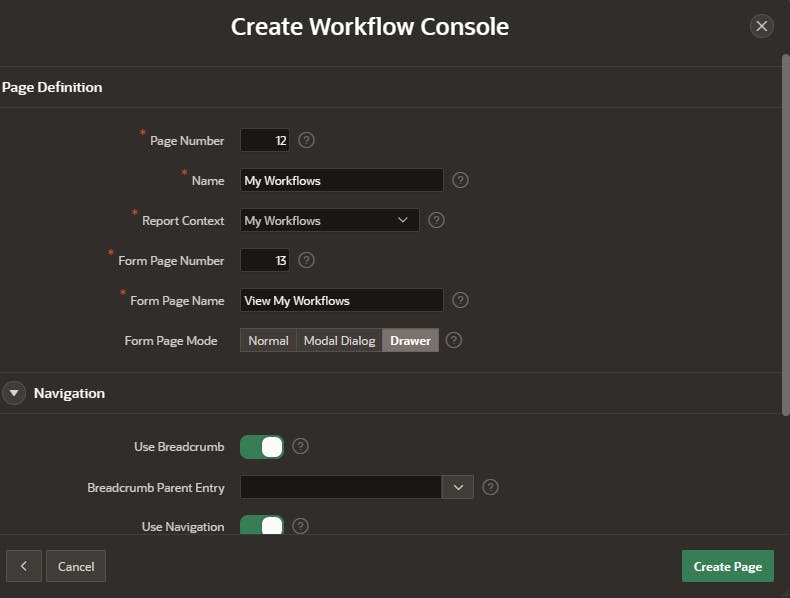
Workflow Console Pages
APEX 23.2 provides some new page templates to help you monitor workflows.
Click on Create Page and select Workflow Console from the list, and click on Next.
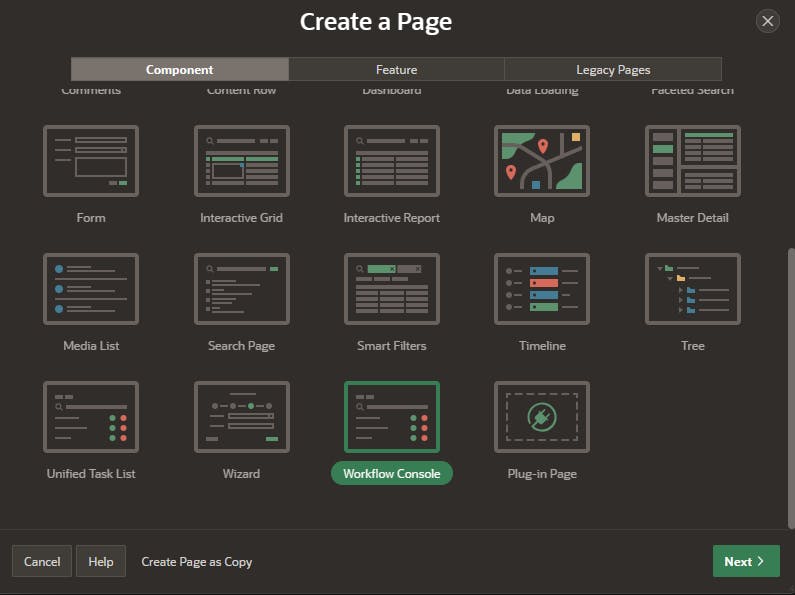
Enter a name and Form Page name and accept the other defaults.
Add a Tasks Page
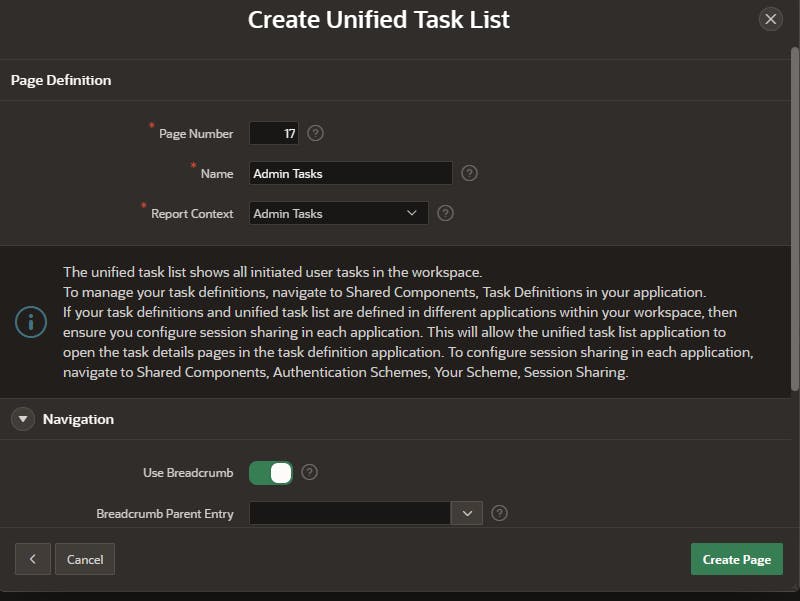
Similar to the workflow console page, let's add a unified task list page to the app.
Click Create Page and select Unified Task List.

Give it a name and select Admin Tasks as the report context, hopefully, for testing purposes, you set yourself up as the Potential Business Owner and Administrator in the task setup steps above. We'll use Admin Tasks, but I'd also recommend hiding the Admin view for most end users.
That's it we have all the pages we need, to test the workflows!
Testing it all
Let's open the app and go to the Upload Document for Review page, it should look like below.

Click on the file chooser and find a simple PDF file to upload. Click on Upload file for review.
An onscreen message should advise the workflow ID that has been started.

You can query these in the APEX_WORKFLOW table too. Or use the My Workflows page we created.
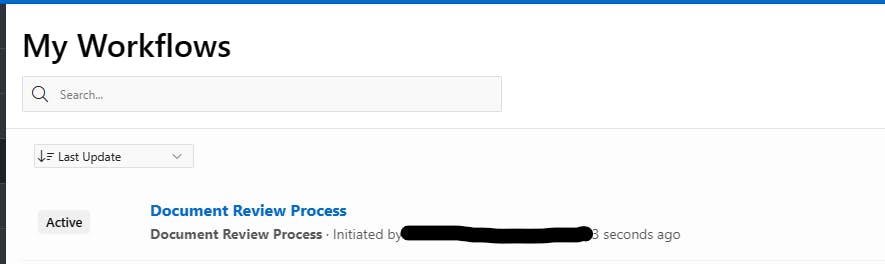
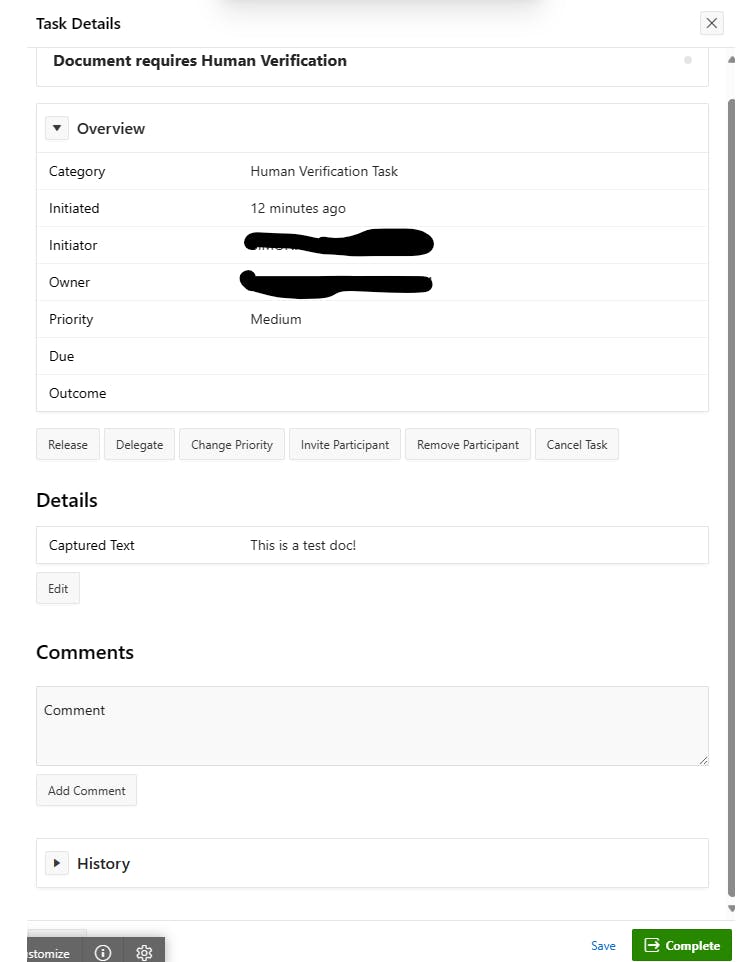
If you click on the card for the workflow the form will open and you can see the workflow details

As this has now moved to the Human Verification Task there will be a task waiting to be actioned too.
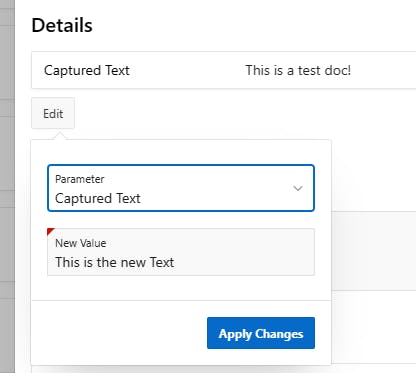
The task owner can then review the task and change the Captured text parameter we set up earlier if required.
To change the parameter, click on the edit button, I notice that the old value doesn't default so will take a look at that another time. But you can type in a new value and click on apply changes to save.
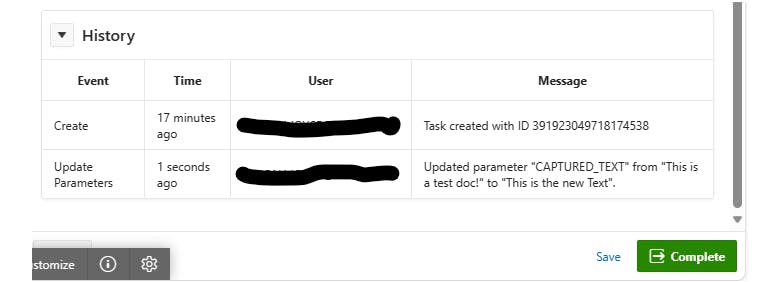
The History region will show the changes made, hit Complete button to finish the review and move the workflow onwards.
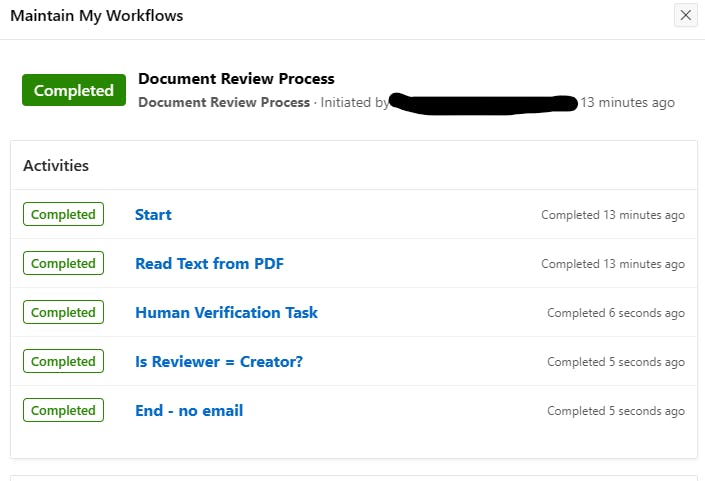
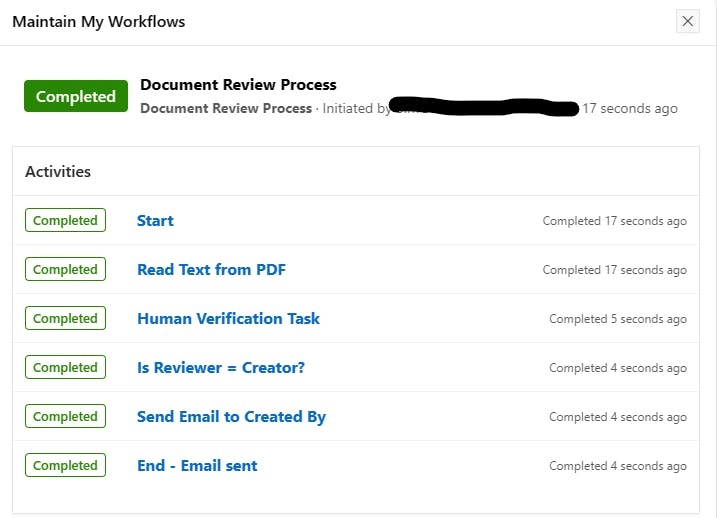
The completed workflow then shows like this. And as I was the reviewer and created by no email was sent.
If I run another one under another user I get.
Summing up
This embedded workflow works well on the basic workflows I've demonstrated above, and as I experiment more with it, I'm sure I'll find more uses for it, next I'll try some looping and timeout processes to replicate more complex workflows.
Whether I'll use it replace Flows4Apex is a different question and not one to be taken lightly, it may be a practical option for new processes though. I would like to see a similar graphical workflow viewer that Flows4Apex uses, as sometimes users need to visualize where the process is at and where it is heading next.
Hope that helped you get an idea of how the new workflow features are configured!
Thanks for reading